A cracked bead of driveway sealant costs about $40 to fix in October. Left alone, water gets underneath, freezes in January, and turns into a $3,000 to $5,000 concrete replacement job by spring. That pattern repeats across almost every system in a house: small, cheap fixes now versus large, unavoidable ones later. The checklist below breaks maintenance into four seasons because most home damage follows weather, not the calendar on your phone.

Spring: Water Management and Winter Damage Check

Spring is when you find out what winter did to your house. Water is the single most expensive thing to ignore, so start there.

  • Walk the roofline with binoculars and look for missing, curled, or cracked shingles. A single missing shingle left through one rainy season can lead to $1,500+ in attic insulation and drywall repair.
  • Clean gutters and downspouts, then run a hose through them to confirm water exits at least 3 feet from the foundation. Clogged gutters are a leading cause of basement seepage.
  • Check the foundation for new cracks wider than 1/8 inch or any that have grown since last year. Photograph them with a ruler in frame so you can track changes.
  • Inspect exterior caulking around windows and doors. Recaulking now costs under $20 in materials; replacing a rotted window sill runs $300 to $600 per window.
  • Test the sump pump by pouring a bucket of water into the pit. If it doesn’t kick on, replace it before storm season, not during it.

Summer: HVAC, Exterior, and Irrigation

Summer heat stresses cooling systems and exterior surfaces. This is also the easiest season to get contractors scheduled before fall backlogs hit.

  • Replace HVAC air filters every 60 to 90 days, more often if you have pets. A clogged filter forces the compressor to work harder and can shorten its life by years; a new unit runs $4,000 to $8,000.
  • Schedule a professional AC tune-up (typically $100 to $200) to check refrigerant levels and clean the condenser coils. Catching a slow refrigerant leak early avoids a burned-out compressor.
  • Inspect exterior paint and siding for peeling or bubbling, particularly on the south and west-facing walls. Repainting now protects the wood underneath; ignoring it invites rot that requires siding replacement.
  • Check outdoor faucets and irrigation lines for leaks. A slow drip at an outdoor spigot can waste thousands of gallons and, if it runs near the foundation, soften soil enough to cause settling.
  • Trim tree branches that hang within 10 feet of the roof. Overhanging limbs scrape shingles, dump extra leaf debris in gutters, and give squirrels a bridge into the attic.

Fall: Sealing the House Before the Freeze

Fall maintenance is about locking in warmth and locking out water before temperatures drop below freezing.

  • Have the furnace inspected and serviced before the first cold snap. A cracked heat exchanger caught in October is a repair; caught in January during a cold week, it’s an emergency replacement at emergency rates.
  • Drain and disconnect garden hoses, then shut off interior valves to exterior spigots if your house has them. A frozen and burst outdoor faucet can flood a basement wall cavity before anyone notices.
  • Seal gaps around pipes, vents, and cable lines entering the house with expanding foam or caulk. These gaps are also the main entry points for mice looking for a winter home.
  • Clean gutters again after leaves drop. Fall leaf load is usually heavier than spring debris and ice dams form fastest where gutters are already full.
  • Check attic insulation depth. Most homes need 12 to 15 inches of blown insulation; anything less lets heat escape and melts roof snow unevenly, which causes ice dams.
  • Test smoke and carbon monoxide detectors and replace batteries. Furnace and fireplace use both spike in fall and winter, raising CO risk.

Winter: Watch and Respond

Winter is less about new projects and more about monitoring the systems you’ve already prepped, since extreme cold exposes any weak point immediately.

  • Keep interior temperatures above 55°F even when away, and open cabinet doors under sinks on exterior walls during cold snaps to let warm air reach pipes.
  • Watch for ice dams along the roof edge. A dam that’s more than 2 inches thick usually means heat is escaping from the attic and needs to be addressed with insulation, not just chipped away.
  • Check the water heater for rust or moisture pooling at the base. Units typically last 8 to 12 years; a slow leak in winter can freeze around the base and crack the tank.
  • After heavy snow, clear it from around HVAC condenser units and dryer vents so airflow isn’t blocked.
  • Reset the humidifier settings if your furnace has one. Indoor air that’s too dry cracks wood trim and flooring; too humid and you get condensation on windows that rots the frames.

Building a System That Actually Gets Used

A checklist only prevents repairs if someone follows it. Put the four seasonal lists into a shared calendar with reminders set two weeks before the season actually changes in your region, not on the calendar date. Keep a simple log, even a notes app entry, recording what was checked, what was found, and photos of anything questionable like foundation cracks or roof wear. This turns a one-time inspection into a record you can compare year over year, which is exactly what catches a slow-developing problem before it becomes a $10,000 one.

Start by picking one task from whichever season is closest on the calendar and scheduling it this week, whether that’s calling an HVAC technician or buying gutter guards. The house doesn’t wait for a convenient time to develop a leak, and neither should the maintenance that prevents one.

Related articles: Repairing or Installing a Sub Floor – Tips for Sub Flooring Repair

A brown ring on your ceiling means water traveled through building materials before it ever reached your eyes, which is why the stain is almost never directly below the actual leak. Water follows joists, insulation, and pipe runs, sometimes moving four or five feet horizontally before it drips onto drywall. Finding the real source takes some detective work, but it’s a process any homeowner can follow with a flashlight, a ladder, and about an hour of patience.

Why the Stain’s Location Rarely Matches the Leak’s Location

Water is lazy. It takes the path of least resistance, running along the top of drywall, following a truss, or pooling in a low spot in the insulation before finally soaking through. A leak near a chimney flashing can show up as a stain 6 feet away, on the far side of the room. This is the number one reason people patch a ceiling, repaint it, and watch the same stain return three months later. They fixed the visible symptom without tracing it back to the actual entry point.

Before you touch anything, look at the shape of the stain. A stain with concentric rings, like a target, usually means repeated small leaks that dried between events, common with condensation or a slow roof leak. A single large, dark blotch with a soft or sagging center suggests an active or recent leak with significant water volume, and that ceiling may need to be opened up regardless of what you find.

Start in the Attic, Not on the Roof

If you have attic access, go up there with a bright flashlight before you climb on the roof. Roof inspections from the ground or ladder are useful, but the attic tells you what’s actually happening at the framing level. Look for:

  • Dark streaks or mold on the underside of the roof deck or on rafters
  • Insulation that’s compressed, discolored, or damp to the touch
  • Rust or white mineral trails on nail shanks poking through the roof deck (a classic sign of condensation, not a leak)
  • Daylight visible through the roof deck, especially around vents, chimneys, or skylights

Pay close attention to any point where something penetrates the roof: plumbing vent stacks, chimneys, skylights, bathroom exhaust fans, and roof-mounted AC lines. Flashing around these penetrations fails far more often than the roof shingles themselves. A 2-inch plumbing vent boot, for example, typically has a rubber gasket that cracks and dries out after 8 to 10 years, and it’s one of the most common sources of a “mystery” ceiling stain in a hallway or bathroom below.

If you can’t get into the attic, note the stain’s position relative to exterior walls and roof features, then check those same areas from outside with binoculars before climbing up.

Rule Out Plumbing, HVAC, and Condensation

Not every ceiling stain comes from the roof. If the stain is directly under a bathroom, kitchen, or laundry room on the floor above, suspect plumbing before roofing. Common culprits include:

  • A wax ring under a toilet that has failed, allowing water to seep out with each flush
  • A supply line or drain fitting under a sink that drips only when the fixture is used
  • A bathtub or shower with cracked grout or a failed caulk seal at the base, letting water run behind the tile
  • An HVAC condensate line that’s clogged or disconnected, common near air handlers in a second-floor closet
  • A window AC unit or ductwork running through the attic that sweats in humid weather

A simple test: run the suspected fixture (flush the toilet several times, run the shower for 10 minutes, run the AC on a humid day) while someone watches the ceiling below with a flashlight. If the stain darkens or a new drip appears within 20 to 30 minutes, you’ve found your source without opening a single wall.

Confirm Whether the Leak Is Active or Resolved

Press gently on the stained area with your fingertips. If it feels soft, spongy, or gives at all, there is likely still moisture in the drywall or the paper facing has separated, and the material needs to be cut out rather than just painted over. A moisture meter (available for $20 to $40 at most hardware stores) takes the guesswork out of this step. Readings above 20% on a pin-style meter indicate wet material that needs to dry out or be replaced before any cosmetic repair.

Old stains from a leak that’s already been fixed (say, from a previous owner’s roof repair) will feel firm and dry, and the moisture meter will read close to the level of the surrounding ceiling. In that case, you’re only dealing with a cosmetic repair, not a structural one.

Repairing the Ceiling the Right Way

Once the source is fixed, whether that meant replacing a boot flashing, resealing a wax ring, or clearing a condensate drain, give the area at least 48 to 72 hours to dry completely before starting cosmetic work. Cutting into drywall that’s still wet just creates a bigger repair.

For a stain with no soft spots, a stain-blocking primer is essential. Regular ceiling paint will not stop a water stain from bleeding through, even after two or three coats. Use a shellac-based primer (such as BIN) or an oil-based stain blocker, apply one coat, let it dry fully (usually 45 minutes for shellac-based products), then repaint with matching ceiling paint.

For sagging, soft, or crumbling drywall, cut out the damaged section back to solid material, using the nearest joists as your cut lines so the new piece has something to screw into. Replace with drywall of matching thickness (most ceilings are 1/2 inch, some are 5/8 inch for fire rating), tape the seams with paper tape and joint compound in three thin coats, sand between coats, then prime with a stain blocker before painting.

If the attic inspection and fixture tests don’t turn up an obvious source, or if the stain keeps reappearing after a repair, it’s worth having a roofing contractor do a water test on the roof (running a hose over specific sections while someone watches the attic from below) rather than guessing again. That test costs far less than a second round of drywall repair.

Related articles: A Seasonal Home Maintenance Checklist That Prevents Expensive Repairs
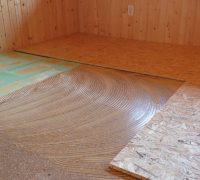
Repairing or Installing a Sub Floor – Tips for Sub Flooring Repair

If you’ve has some type of water damage or insect infestation, you may find that you have damaged subflooring in the home. Sub-flooring is just what the term sounds like: material underneath the surface you walk on. It may be concrete, plywood, or several other types of material. Unfortunately, even the most robust subfloor material can become cracked or mildewed. Water can become trapped between the floor and the subfloor or between the top surface and the subfloor. Those and many other types of problems will often require making repairs.

It’s usually expensive and never pleasant but, like dental work, putting it off generally leads to bigger problems before long. Depending on the extent of the problem, it may require anything from removing a few tiles to stripping the entire top floor surface off and beginning anew.

The need for repairs can be detected in several ways, again depending on the nature and extent of the problem. In some cases, it’s an area on the top floor with a visible gap, say in the bathroom where water will certainly leak down. In other cases, it may be just a musty odor from mildew that won’t go away no matter how well the floor is cleaned. Sometimes it appears as a dip or bowled area in a section of carpet, which becomes especially obvious when it’s walked on.

Once confirmed, tackle the problem as soon as possible.

How to go about that will vary with the type of top floor installed. Vinyl, for example, can very rarely be reused and will have to be replaced with new material. With care, some stone tiles can be removed without cracking, then reused. Wood is a borderline case. Laminates can sometimes be reused, but it’s usually not worth the extra effort required to remove them without damage. The carpet will often have to be replaced with a new carpet or another flooring material.

Remove any flooring in the damaged area. Then inspect the damaged sub-floor. The most typical problem is water that has rotted plywood. Though never easy, there are worse things to have to repair. Cut away the rotted plywood, removing an entire sheet if possible. If not, simply cut a large enough area around the damage to ensure that all the rot has been cleared out. Mildew is made of living organisms and they can spread. Termite or other insect-induced damage will require an exterminator. If not stopped, they’ll continue to do more damage.

There’s one potential upside to an incident of a damaged subfloor. It creates the opportunity to reevaluate the type of flooring desired. A plywood sub-floor covered with carpet can be re-fitted with finished concrete or a laminate, for example.

Even if the same type of sub-flooring and flooring is laid down as a replacement, it’s a chance to use improved materials for the repair project. Wood sub-floors are much better than their predecessors from 20-50 years ago, thanks to improved treatments that will reduce the odds of ever having to do the work again. Carpets today have better water-resistant chemicals embedded in the fibers than in decades past.

Ensure that the new sub-floor materials, whatever you use, are perfectly flat to support the new floor. They have to be sturdy enough to bear the pressure of intended traffic. Sub-floor repairs are not something anyone wants to have to do twice.

Related articles: Tracing a Ceiling Water Stain to Its Source and Repairing It for Good